
I have a MacBook Pro but I wanted to use the Mac OS on my desktop for testing purposes only. So I looked up some sites and read through some articles and after trying a few it seemed a couple of steps worked on one site and a couple on another site and then I needed some side steps to get it all working. For example Macbreaker.com has a great article on installing Yosemite on your PC (Non-VM). While as some forum post on xda-developers had a quick and dirty install Yosemite on your VirtualBox from beta, but it didn’t work for me. I would get an error Undefined 0 and so I had to track down a solution for that which is geared towards creating a bootable USB drive for Yosemite. During those previous steps I had to figure out how to get the downloaded Yosemite Install from my mac into a format I can put on my Windows 8 machine for my virtualbox. So I had to convert the downloaded app the an ISO format. Though if you combine this with the bootable USB steps I needed, it took a matter of jumping around to get it working. Then to top it off I needed the MultiBeast files for sound, internet etc from the first article.
So I’ve taken the time to organize all the steps from all those articles into one that worked for me and made some flight modifications to the steps where needed.
Pre-Req Setup:
Install VirtualBox and make sure it shows 64bit OS Options.
If you don’t have the 64 bit options you need to do one or both of the following.
- Enable Intel Virtualization Technology (VT-X/AMD-V) in your Bios
- You have to first remove Hyper-V. (I believe you can add it back afterwards but that’s just what I’ve read, I’ve never added it back myself).
Step 1: Download Yosemite on a Mac System
- OS X Yosemite (Free): The method used by this guide requires that you download a free copy of the Yosemite installer app from the Mac App Store. Though the Mac App Store is included in Mac OS X 10.6.6 and newer, you have to be running at least 10.6.8 to download Yosemite.
Edit: Once that’s downloaded then you should be able to run the following commands to start the process of converting the downloaded app into an iso.
Step 2: Extract, Mount, Start Creation of ISO files
# Mount the installer image
hdiutil attach /Applications/Install\ OS\ X\ Yosemite.app/Contents/SharedSupport/InstallESD.dmg -noverify -nobrowse -mountpoint /Volumes/install_app

# Convert the boot image to a sparse bundle
hdiutil convert /Volumes/install_app/BaseSystem.dmg -format UDSP -o /tmp/Yosemite

# Increase the sparse bundle capacity to accommodate the packages
hdiutil resize -size 8g /tmp/Yosemite.sparseimage

# Mount the sparse bundle for package addition
hdiutil attach /tmp/Yosemite.sparseimage -noverify -nobrowse -mountpoint /Volumes/install_build

# Remove Package link and replace with actual files
rm /Volumes/install_build/System/Installation/Packages
cp -rp /Volumes/install_app/Packages /Volumes/install_build/System/Installation/
Step 3: Extract missing BaseSystem files for future ISO files
…you'll need to open theInstallESD.dmg file from your Yosemite Install app.
- Head to Applications
- Find the Install OS X Yosemite app
- Right-click on it and Show Package Contents
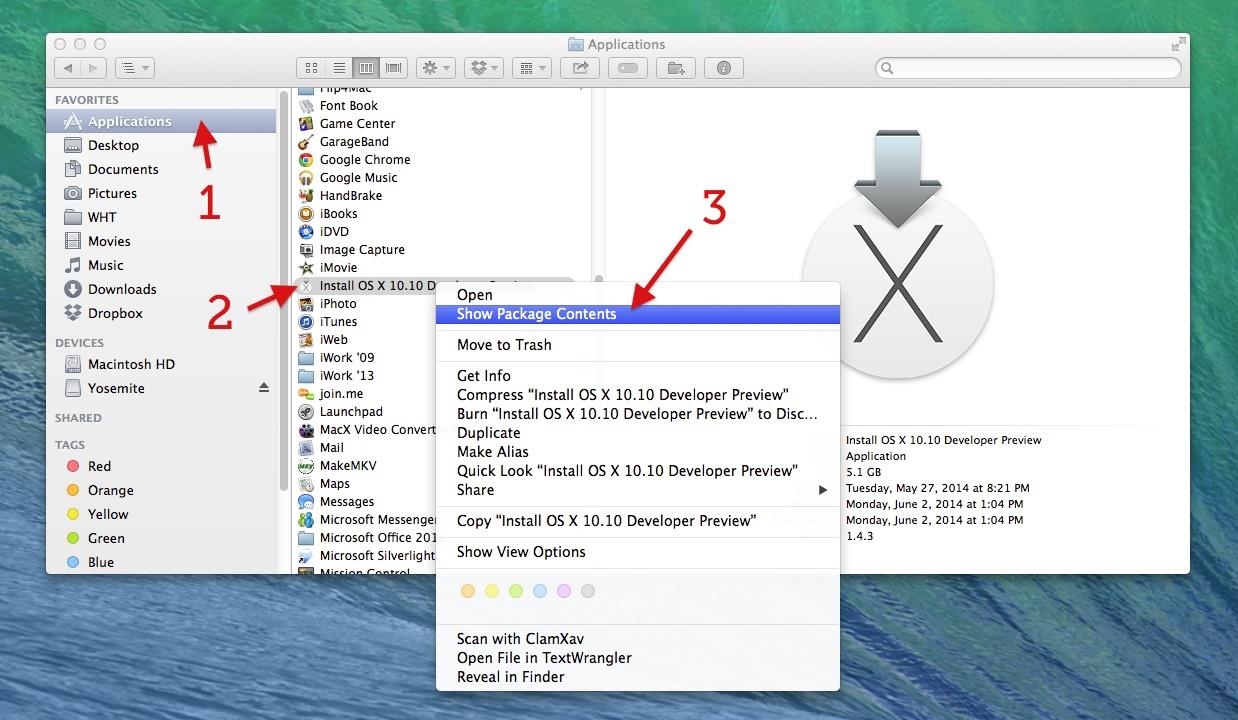
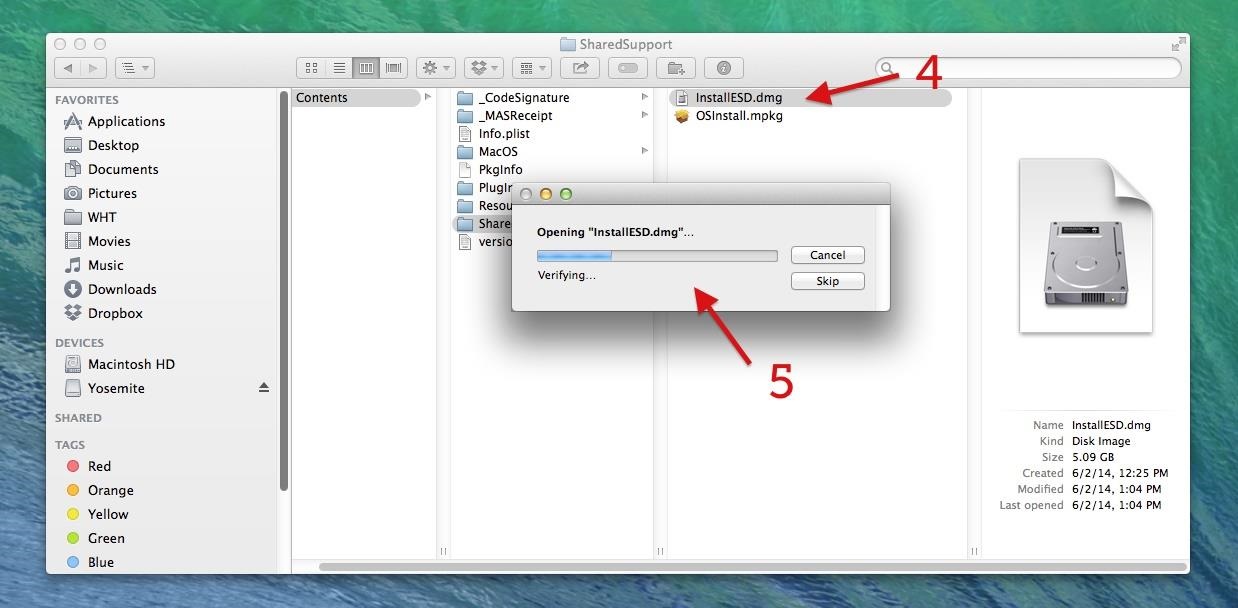
- Navigate to Contents -> SharedSupport and open InstallESD.dmg
- Wait for it to finish Verifying... and mount
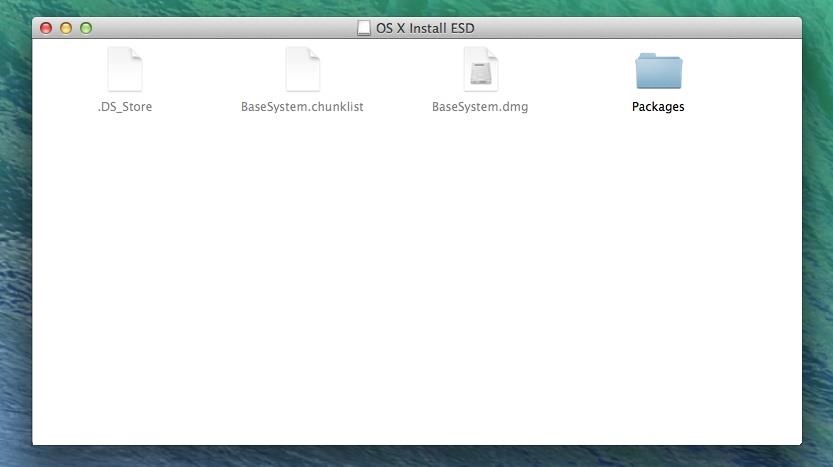
- When it mounts, you'll see a new window with a Packages folder
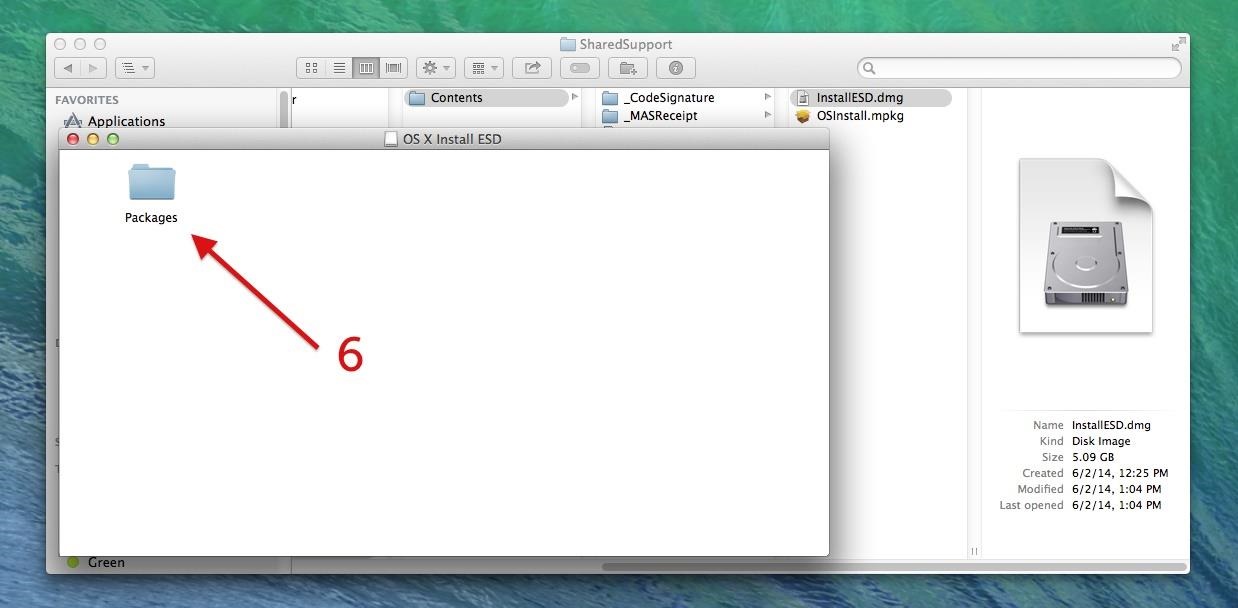
Now, don't do anything with this Packages folder just yet. First, we need to unhide the files located in this newly mounted OS X Install ESD image.
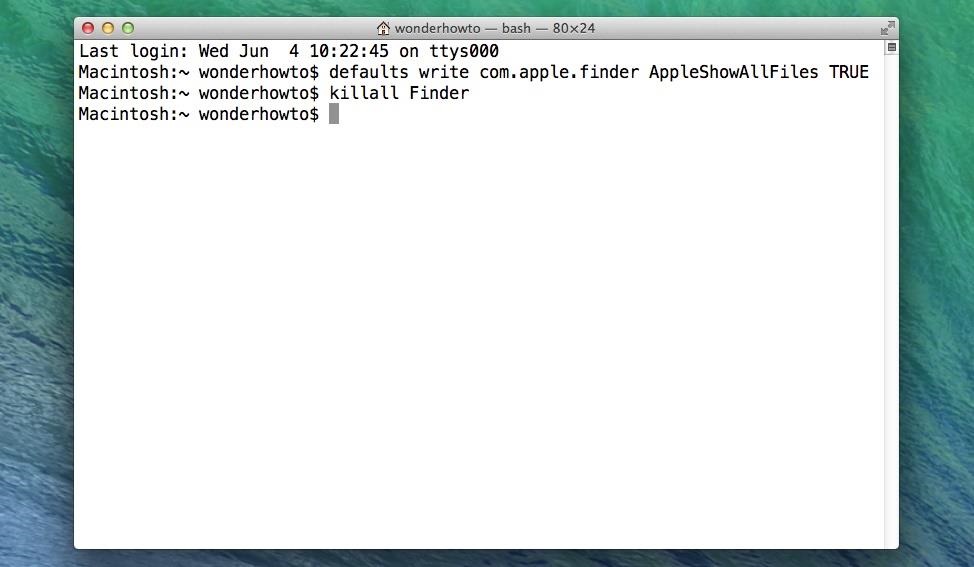
To see the hidden files in the OS X Install ESD image, open up a Terminal and input the following two commands (hit Enter after each one). And don't worry, we'll be undoing this at the end of this guide.
- defaults write com.apple.finder AppleShowAllFiles TRUE
- killall Finder
If successful, you will see three other files slightly grayed out in the mounted OS X Install ESD window. The one we need here is BaseSystem.dmg.
Step 4: Copy the BackSystem.dmg file to /Volumes/install_build/
I ended up copying with the .dmg and the .chunklist but article says you only need the .dmg.
Easiest way for me I created a folder on the desktop called “tmp” then I copied both files from OS X Install ESD into this “tmp” folder on my desktop. Then I was able to run the cp (copy) command in terminal. When you open Terminal it drops you into your user folder. You can switch to your “tmp” folder on your desktop like this
cd ~/Desktop/tmp
Once you are in the folder those files are located then copy them to the future ISO files location
cp BaseSystem.dmg /Volumes/install_build/
cp BaseSystem.chunklist /Volumes/install_build/
Step 5: Build the ISO file
This will put an iso file on your desktop called Yosemite.iso
# Unmount the installer image
hdiutil detach /Volumes/install_app

# Unmount the sparse bundle
hdiutil detach /Volumes/install_build

# Resize the partition in the sparse bundle to remove any free space
hdiutil resize -size `hdiutil resize -limits /tmp/Yosemite.sparseimage | tail -n 1 | awk '{ print $1 }'`b /tmp/Yosemite.sparseimage

# Convert the sparse bundle to ISO/CD master
hdiutil convert /tmp/Yosemite.sparseimage -format UDTO -o /tmp/Yosemite

# Remove the sparse bundle
rm /tmp/Yosemite.sparseimage

# Rename the ISO and move it to the desktop
mv /tmp/Yosemite.cdr ~/Desktop/Yosemite.iso
Now copy this 6GB file over to your Windows Machine. I used a 16GB USB which was formatted in ExFat
You can now re-hide the hidden files running the same command but with FALSE
- defaults write com.apple.finder AppleShowAllFiles FALSE
- killall Finder
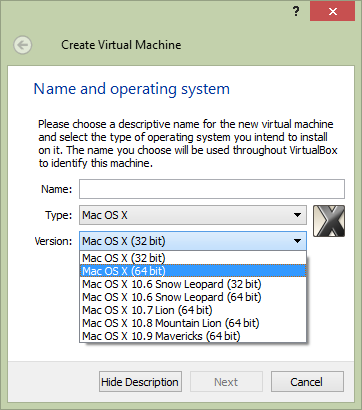
STEP 6. Setup VirtualBox
Create your new VirtualBox VM according to the following:
Edit: I ended up using 8GB of ram.
- Create a VM disk with > 40 GiB
- Under General > Basic:Version, use "Mac OS X (64bit)"
- Under System > Motherboard
    : Base Memory, select 6 GiB VM RAM
    : Chipset, use PCIIX
    : Extended Features, select all to use EFI, ACPI, and UTC
- Under System > Processor, select only 1 CPU
- Under System > Acceleration: Hardware Virtualization, select all.
- Under Display > Video:Video Memory, use 128 MB, and do not select any Extended Features (2D/3D)
- Under Storage > Storage Tree, select the "Empty" (CD icon) and go to:
  "CD/DVD Drive" selector and click on the right-most CD icon for a
  drop-down menu. On that menu, browse to and select your *.iso
  image you downloaded above. Also select the "Live CD/DVD" option.
- Save and close VirtualBox.
Next you need to tune VB to impersonate some recent Apple HW. First re-start VirtualBox. Once started, run an administrative command shell and run these. Note that the first command takes a minute.
Note: Make sure you run the command from where Virtual Box is installed. By default that is in C:\Program Files\Oracle\VirtualBox\

Run each line
VBoxManage.exe modifyvm "YourVMname" --cpuidset 00000001 000306a9 04100800 7fbae3ff bfebfbff
VBoxManage setextradata "YourVMname" "VBoxInternal/Devices/efi/0/Config/DmiSystemProduct" "MacBookPro11,3"
VBoxManage setextradata "YourVMname" "VBoxInternal/Devices/efi/0/Config/DmiSystemVersion" "1.0"
VBoxManage setextradata "YourVMname" "VBoxInternal/Devices/efi/0/Config/DmiBoardProduct" "ILoveApple"
VBoxManage setextradata "YourVMname" "VBoxInternal/Devices/smc/0/Config/DeviceKey" "ourhardworkbythesewordsguardedpleasedontsteal(c)AppleComputerInc"
VBoxManage setextradata "YourVMname" "VBoxInternal/Devices/smc/0/Config/GetKeyFromRealSMC" 1
Close and reopen VirtaulBox for the changes to take effect. Be very patient, and after some error messages your OSX should bootup to start the setup process.
Step 7. The Setup Process
Formatting the (new) VM disk/partition Once the boot process starts loading, you'll have to select language and then choose the boot disk to install on. But only the mounted CD-ROM (DMG) image is available so you’ll have to go into Disk Utility and format the VM disk partition and give it a name.
The name can be whatever you want it to be
Now you can exit DIsk Utility and continue installing by selecting your new disk...
Once installation is finished, the system will reboot and you will be asked a few setup questions (this took awhile). Also keep in mind if the VirtualBox is not the focused application you might not see the screen change when it’s done do to video drivers.
After that the Feedback Assistant will ask you signup. Force close it.
Edit: I never got this screen
Be sure at this point to remove the .iso file from the CD Storage Device in VirtualBox else if you reboot you’ll end up going back into setup.
Step 8: Multibeast
Multibeast is a collection of kext files that you'll need to install for your Hackintoshes to have sound, internet, a high resolution screen, and more. Different Hackintosh builds require different Multibeast setups, though most setups are very similar. Whether you're installing Mac OS X on your computer for the first time, or just updating your computer from an older version of OS X, you'll probably have to run Multibeast after the initial installation of Yosemite. Find out what Multibeast options you need to install.
Edit: Now from here I’m not sure. My version runs but it’s kind of slow and I can’t change the resolution because I need to track down the right drivers and use Multibest or manually install them. You may have difference outcomes.

To run Multibeast in OS X Yosemite, you may have to go the "Security" section of System Preferences in Mac OS X, go to the "General" section, and check "Anywhere" in the "Allow applications" section. After running Multibeast, you'll also probably want to change your BIOS settings back to normal (from Step 4).

Well anyway, at this point you should be done!