

Understanding Visual Studio 2013 and Git Source Control
Previous TFS Mindset
If you are used to using TFS (Team Foundation Server), switching over to Git on Visual Studio 2013 is a different thought process. We’re used to thinking with TFS, local files and then I “check-in” “check-out” back and forth on the server. The nice thing about this was that you knew your files were backed up on the server. The downside to this is that in a team environment you’re checking in code that might break the build and cause someone else to have problems when they get the latest for various reasons. You forgot to check in a class or your code wasn't ready and there isn't gated check in process. Either way this is the mental image when you think of VS2013 and TFS.

With Git, using your own Git Server or GitHub and trying to think of Git as you think of TFS starts to cause confusion around the new Team Source view for handling projects.

I’ll attempt to simply the understanding and how it works.
End Result when using VS and Git. A New Mindset.
Ultimately this is the end result from “Adding” or “New” or “Cloning” a project. From Visual Studio you Check-In/Out from a local Git repository. This is great in that you can check in code without affecting others. You’ll need to backup your local files though. Then after you get to a point you deem worthy, you “Sync” the changes to the Git server.

Goal: Create a local Git Repo. There are three ways to start a new Git Repo.
Method A) Create a “New” Local GitRepo

You create a local project in Visual Studio 2013. You can then add it to a “New” git repo.
- You’ll now have a new .git folder in your Project Folder
- Note: if this folder is in a Dropbox folder you’ll get an error “An error was raised by libgit2. Category = Os (Error). Failed to lockfile to ‘…‘:Access is denied”. . Simple click on “Add” and put in the path to the new Git Repo location.
- You’ll now see your local repo in the Git Repo list.


Method B) Or “Add” an Existing Local Git Repo
You already have a local Git Repo you want to use you then click on “Add” and find the existing local Git Repo. All previous Git Settings with this Repo are intact so when you Sync it will sync to wherever it synced before or prompted you to specify.

Method C) Or “Clone” an Online Git Repo to a new Local Git Repo
You want to pull down files from an existing online project you can then “Clone” the repo from the Git server to new local repository and then open the project in VS.
Now you can Sync to an online Git Server
Now double click one of the repos to open up that project.
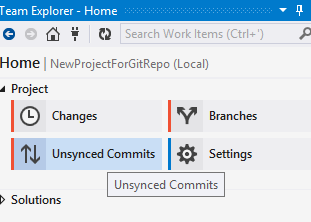
Click on Unsynced Commits
Depending on if the project is New or has already been synced or is a new Cloned project you’ll see one of two screens.
This is the screen you’ll see if the project is newly created. Add in the URL to the online GitRepo you want to perform the initial push too and Publish.

This is the screen you’ll see if the project was an existing GitRepo Add or a Clone from an online Git Server. Clicking “Sync” will then sync your local files with the server files.
